[:en]

We are working on a modern website that is user-friendly, informative and reflective of our SU identity. Thank you for your patience.
[:]
[:en]

[:]
[:en]
Many SU staff members have experienced lost connections during a Teams meeting or sometimes have technical glitches such as poor or broken voice connections. With this short article, we provide some tips to ensure that your next Teams meeting has minimum disruptions. The tips are split into three categories:
The good practices include:
Preparing for a trouble-free meeting – especially important if you are the host or presenter for a meeting:
5. If you share your Internet with other users (e.g. at home), ensure that the others know and do not hog the Internet connection. (e.g. do not play video, stream content, run updates).
Turn the camera off and use audio only if the speed test or PC resources tests did show limitations.
6. If you are the host or presenter and have doubts about your Internet connection, rather work from your office on campus where you are unlikely to run into limitations. Use Ethernet (a cable connection to your router) rather than Wi-Fi if you have Ethernet available.
7. Have a second device with Microsoft Teams as a standby, e.g. a mobile phone with an LTE data connection. Practice switching devices so that you are familiar with how it works before you host a meeting.
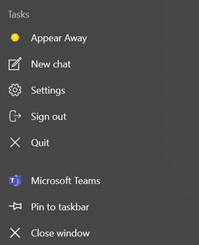
Steps to take if you experience a poor connection:
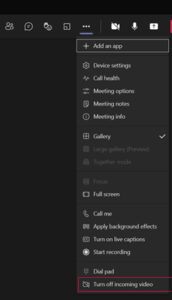
3. Switch to another device as a last resort, for example MS Teams on your mobile phone or tablet.
[:af]
Die meeste US-personeel het waarskynlik al die frustrasie ervaar van gebroke internetverbindings tydens ʼn Teams-vergadering of ander tegniese uitdagings soos swak of gebroke verbindings. Met hierdie kort artikel verskaf ons `n paar wenke om te verseker dat jou volgende Teams-vergadering met die minimum probleme gepaardgaan. Die wenke is verdeel in drie kategorieë:
Goeie praktyke sluit in:
Voorbereiding vir ʼn moeitevrye vergadering, veral belangrik as jy die vergadering lei:
5. Indien jy jou Internet (bv. tuis) met ander gebruikers deel, maak seker dat hulle weet jy is in ʼn vergadering sodat die Internet-verbinding nie onnodig oorlaai word nie (met bv. video’s, TV kyk of opdaterings) Skakel jou kamera af en gebruik slegs oudio as die spoedtoets of rekenaar se hulpbronne beperkings uitgewys het.
6. Indien jy die vergadering lei of aanbied en jy twyfel oor jou verbinding tuis, doen dit eerder vanaf die kantoor of kampus waar dit minder waarskynlik is dat jy probleme sal hê. Gebruik Ethernet (ʼn kabel direk verbind aan jou internetpunt) eerder as Wi-Fi indien dit beskikbaar is.
7. Hou ʼn tweede toestel met Microsoft Teams byderhand vir ingeval, b.v. ʼn selfoon met LTE-data. Oefen om toestelle te wissel sodat jy gewoond is aan hoe dit werk voordat jy `n vergadering moet lei.
Stappe om te neem indien jy ʼn slegte verbinding het.
3. Skakel oor na ʼn ander toestel as die laaste alternatief, byvoorbeeld MS Teams op jou selfoon of tablet.
[:]
[:en]
Are the characters in your emails suddenly substantially smaller than a year or two ago? Not? Then you are clearly still too young. For the rest of us – you know who you are, I see you squinting at your screen – there is a solution.
We all know you can change the font of your text in Outlook, for example. The only problem is that the receiver on the other end will have to also read your email in Tahoma size 16. Ideally you should only use a font size of 11 or 12 whether you work in a Word document, in Teams or compile an email. Instead of changing the default font in your applications, there’s another way.
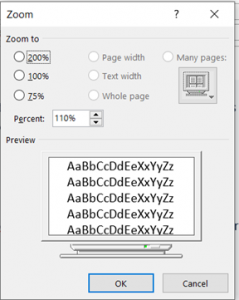
3. The same can be done if you have a mouse with a scroll wheel button to adjust text zoom level (see below)

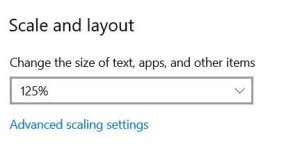
4. Not all apps support the Text Zoom by using the touch-pad or Ctrl + mouse wheel. Here is another method for Windows 10 if you want to change the size of text, apps & other items for all Windows apps, other than just Outlook & MS Teams. Just right-click anywhere on your desktop. Select Display Settings and choose the % you want to enlarge it with.
If you are still struggling you are welcome to log a request for one of our technicians in the ICT Partner Portal.
[:af]
Lyk die karakters in jou e-posse skielik beduidend kleiner lyk as net `n jaar of twee gelede? Nie? Dan is jy duidelik te jonk. Vir die res van ons – diegene wat hulle oë op skrefies trek in plaas van `n leesbril te kry – daar is ʼn oplossing.
Ons weet almal dat jy die fontgrootte van die teks in, byvoorbeeld, Outlook kan verander. Die enigste probleem is dat die ontvanger aan die ander kant ook jou e-pos in Tahoma, grootte 16 sal moet lees. Ideaal gesproke behoort fontgrootte by verstek 11 of 12 te wees, hetsy jy in Word dokument, Teams of Outlook werk. In plaas van om die fontgrootte te stel kan jy een van die volgende opsies probeer:
3. Indien jy ʼn muis het met ʼn rolwiel-knoppie het, kan jy ook jou Zoom-vlak aanpas. (sien onder)
4. Nie alle toepassings ondersteun die Text Zoom deur middel van die taspaneel of Ctrl + muis-rolwieletjie nie. Hier is nog ʼn metode in Windows as jy die teks, toepassings of enigiets anders in Windows, bo en behalwe Teams, wil verander. Regskliek net enige plek op jou invalskerm. Kies Display Settings en Scale and layout. Kies die % waarmee jy dit wil vergroot.
As jy steeds sukkel is jy welkom om ʼn versoek aan te teken vir een van ons tegnici op die ICT Partner Portal
[:]
[:en]
![]() If the responsibility of organising meetings often falls on your shoulders you will know that it could be a challenge to find a time which works for everyone. Fortunately Microsoft has found the solution with one of their Office365 ad-ins.
If the responsibility of organising meetings often falls on your shoulders you will know that it could be a challenge to find a time which works for everyone. Fortunately Microsoft has found the solution with one of their Office365 ad-ins.
FindTime is an optional add-in which simplifies the process of finding the appropriate date and time for a meeting between colleagues. It’s particularly useful when there are attendees from non-SU, external companies.
With FindTime the organiser creates a voting poll where the available dates and times are listed. The attendees can then vote for the times and dates which suit them best.
When the poll is compiled the following functions are also available:
The FindTime add-in can be installed in Outlook 365 (for web-based email, the Outlook client or Apple OSX). If external people are invited to the meeting it’s not necessary for them to use Outlook – everything is done through a link sent by FindTime.
You can install FindTime yourself from the Microsoft website or log a request on the ICT Partner Portal for one of our technicians.
[ARTICLE BY ARLO KOEN]
[:af]
![]()
As jy gereeld vergaderings moet reël weet jy waarskynlik dat dit dikwels ʼn uitdaging is om die gepaste tyd in almal se skedules te kry. Gelukkig het Microsoft ʼn oplossing met een van hulle Office365-toepassings.
FindTime is ʼn addisionele toepassing wat die heen en weer geskarrel om ʼn geskikte dag en tyd vir ʼn vergadering tussen kollegas te vind. Dit is veral handig as persone van eksterne maatskappye ook die vergadering moet bywoon.
Met FindTime skep die organiseerder ʼn meningspeiling waarin die beskikbare datums en tye gelys word. Uitgenooides kan dan stem watter dae en tye hulle die beste sal pas.
Wanneer die peiling opgestel word is die volgende funksies ook beskikbaar:
Die FindTime-toepassing kan bygevoeg word in Outlook 365 (webgebaseerde e-pos, die Outlook-kliënt of Apple OSX). Indien eksterne persone uitgenooi word na ʼn vergadering hoef hulle nie self Outlook te gebruik nie – alles word uitgevoer deur middel van ʼn skakel wat FindTime stuur.
Jy kan self FindTime installeer vanaf Microsoft se webwerf. of ʼn versoek aanteken op die ICT Partner Portal vir een van ons tegnici.
[ARTIKEL DEUR ARLO KOEN]
[:]
