SEARCH
  • [:en]Recent Posts[:af]Onlangse bydraes

  • [:en]Categories[:af]Kategorieë

  • [:en]Archives[:af]Argiewe

Tips

[:en]Extra layer of security added to campus computers [:af]Ekstra vlak van sekuriteit vir rekenaars op kampus [:]

Monday, August 2nd, 2021

[:en]

Cyber crime is a constantly evolving field. Even though the majority of viruses were created as pranks, it’s essential to stay informed of the various risks that exist on the internet if you want to stay safe online. Here’s a breakdown of the basics: 

Malware, or malicious software, is a catch-all term for any type of malicious computer program. Malware is the most common type of online threat.

Ransomware is an emerging form of malware that locks the user out of their files or their device, then demands an anonymous online payment to restore access.

Adware is a form of malware that hides on your device and serves you advertisements. Some adware also monitors your behaviour online so it can target you with specific ads.

Spyware is a form of malware that hides on your device, monitors your activity, and steals sensitive information like bank details and passwords.

The world of cyber crime is very similar to that of technology. Every year, new trends, breakthroughs, and tools emerge.

You’ve probably noticed a Malwarebytes Threat Scan icon on your desktop or laptop (Figure 1). Don’t worry, this isn’t a brand-new type of malware. Stellenbosch University’s IT department has added an extra layer of security to campus computers.

Figure 1

Malwarebytes Incident Response is the trusted standard in automated endpoint remediation. Unfortunately, with the current environment, some malware will return after removal and Malwarebytes will prompt you to initiate a restart (Figure 2).

Figure 2

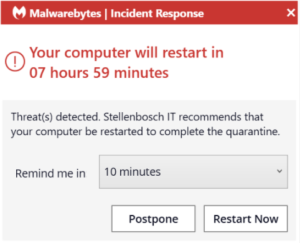
This is because the malware will sync to your browsers profile and will be synced back to your device after it has been removed.  If you are experiencing such daily prompts for restarts by Malwarebytes, we suggest that you log a request on the ICT Partner Portal for a technician to assist with further remediation.

[ARTICLE BY BRADLEY VAN DER VENTER]

[:af]

Kubermisdaad is ʼn veld wat voortdurend ontwikkel. Alhoewel die groter meerderheid virusse aanvanklik as poetse geskep is, is dit deesdae noodsaaklik om op hoogte te bly met die verskeie risiko’s op die internet as jy veilig aanlyn wil wees. Hier is ʼn kort opsomming van die basiese gevare: 

Malware, of malicious software, is ʼn oorkoepelende term vir enige kwaadwillige rekenaarprogram. Malware is die mees algemene vorm van aanlyn-bedreiging. 

Ransomware is ʼn nuwe vorm van malware wat gebruikers se toegang tot dokumente of toestelle sluit en dan anoniem ʼn aanlynbetaling eis om toegang te herstel. 

Adware is ʼn vorm van malware wat versteek is op jou toestel en advertensies aan jou vertoon. Sommige adware monitor ook jou aanlyngedrag sodat dit pasgemaakte advertensies vir jou kan wys. 

Spyware is ʼn vorm van malware wat versteek is op jou toestel, jou aktiwiteite monitor en sensitiewe data soos bankinligting en wagwoorde steel. 

Die wêreld van kubermisdaad is soortgelyk aan die van tegnologie. Elke jaar is daar nuwe tendense, deurbrake en hulpmiddele. 

Jy het moontlik opgemerk dat daar onlangs ʼn Malwarebytes Threat Scan ikoon op jou skootrekenaar of tafelrekenaar se skerm verskyn het (Figuur 1). Moenie skrik nie, dis nie ʼn nuwe tipe malware nie! Universiteit Stellenbosch se IT-afdeling het ʼn ekstra vlak van sekuriteit op kampusrekenaars bygevoeg. 

Figuur 1

Malwarebytes Incident Response is vertroude standaard in outomatiese eindpunt remediasie. Ongelukkig, onder huidige omstandighede, beteken dit dat sommige malware kan terugkeer nadat dit verwyder is. Indien dit gebeur sal Malwarebytes jou aanpor om jou rekenaar af en aan te sit, soos aangedui in Figuur 2.

Figuur 2

Dit gebeur omdat die malware moet sinkroniseer met jou webblaaier se profiel. Dit sal weer terug sinkroniseer met jou toestel nadat dit verwyder is. Indien jy daagliks sulke versoeke van Malwarebytes kry om jou rekenaar af te sit, stel ons voor dat jy ʼn versoek aanteken op die ICT Partner Portal sodat ʼn tegnikus jou kan help. 

[ARTIKEL DEUR BRADLEY VAN DER VENTER]

[:]

[:en]Microsoft Teams performance tips[:af]Microsoft Teams werkverrigting wenke[:]

Tuesday, July 6th, 2021

[:en]

Many SU staff members have experienced lost connections during a Teams meeting or sometimes have technical glitches such as poor or broken voice connections. With this short article, we provide some tips to ensure that your next Teams meeting has minimum disruptions. The tips are split into three categories:

  1. Good practices
  2. Preparing for a trouble-free meeting
  3. Steps to take if you experience a poor connection

The good practices include:

  1. Regularly shut down and restart your PC – at least once a day. The shut down and restart cleans the PC of processes taking up resources. A good habit is to shut down at the end of the workday, and start fresh in the morning.
  2. Regularly run updates, ensuring that the operating system and applications are up to date. This should happen almost automatically on University owned PCs.
  3. Regularly run virus checks.

Preparing for a trouble-free meeting – especially important if you are the host or presenter for a meeting:

  1. Close all unnecessary applications.
  2. Test if you have sufficient Internet bandwidth available. You can do this by running an Internet bandwidth test at Speedtest by Ookla – The Global Broadband Speed Test.
    For voice only and sharing images you need less than one MB/second. For sharing applications and using your webcam, you need between 1 and 2 MB/s.
    For video you preferably need 2 MB/s.
  3. Test if your PC has sufficient resources.
    For Windows 10 press Ctrl + Shift + Esc.
    For a Mac the equivalent is the Activity Monitor: Press Command+Spacebar to get the Spotlight search field. 
    Start typing “Activity Monitor.”
    The CPU usage percentage should be under 50% and memory usage below 60% before you start MS Teams.
  4. If your MS Teams app was open before a meeting, quit and start MS Teams again at least 10 minutes before your meeting.
    To do this right click the Teams icon on the task bar and Quit, then start again.

5. If you share your Internet with other users (e.g. at home), ensure that the others know and do not hog the Internet connection. (e.g. do not play video, stream content, run updates).
Turn the camera off and use audio only if  the speed test or PC resources tests did show limitations.

6. If you are the host or presenter and have doubts about your Internet connection, rather work from your office on campus where you are unlikely to run into limitations. Use Ethernet (a cable connection to your router) rather than Wi-Fi if you have Ethernet available.

7. Have a second device with Microsoft Teams as a standby, e.g. a mobile phone with an LTE data connection. Practice switching devices so that you are familiar with how it works before you host a meeting.

Steps to take if you experience a poor connection:

  1. Turn the camera off if it was on.
  2. Turn off incoming video: (last item under the three dots menu).
    You will still be able to see shared screens and comments.

3. Switch to another device as a last resort, for example MS Teams on your mobile phone or tablet.

[:af]

Die meeste US-personeel het waarskynlik al die frustrasie ervaar van gebroke internetverbindings tydens ʼn Teams-vergadering of ander tegniese uitdagings soos swak of gebroke verbindings. Met hierdie kort artikel verskaf ons `n paar wenke om te verseker dat jou volgende Teams-vergadering met die minimum probleme gepaardgaan. Die wenke is verdeel in drie kategorieë:

  1. Goeie praktyke.
  2. Voorbereiding vir ʼn moeitevrye vergadering.
  3. Stappe om te neem indien jy ʼn slegte verbinding het.

Goeie praktyke sluit in:

  1. Skakel jou rekenaar gereeld aan en af – ten minste een keer per dag. Die af- en aanskakel verwyder prosesse op jou rekenaar wat onnodig hulpbronne gebruik. ʼn Goeie gewoonte is om aan die einde van die dag af te skakel en weer vars in die oggend te begin.  
  2. Doen gereeld opdaterings en verseker dat die bedryfstelsel en toepassings op datum is. Dit behoort normaalweg outomaties te gebeur op rekenaars wat US-bates is. 
  3. Loop gereeld jou anti-virus sagteware om te voorkom dat jou rekenaar virusse kry.

Voorbereiding vir ʼn moeitevrye vergadering, veral belangrik as jy die vergadering lei:

  1. Maak alle onnodige toepassings toe. 
  2. Toets of jy wel voldoende Internet-bandwydte beskikbaar het. Jy kan dit doen deur ʼn Internet-bandwydte toets te doen met Speedtest by Ookla.
    Vir slegs klank en die deel van grafika het jy minder as een MB/sekonde nodig.
    Vir die deel van toepassings en die gebruik van jou webkamera, het jy tussen 1 en 2 MB/sekonde nodig.
    Vir video het jy verkieslik 2 MB/sekonde nodig.
  3. Toets of jou PC genoeg hulpbronne het.
    Vir Windows 10 druk Ctrl + Shift + Esc.
    Vir MAC is die ekwivalent die Activity Monitor: Druk Command+Space bar om die Spotlight soekveld op te roep. 
    Tik Activity Monitor in die soekveld.
    Die persentasie CPU-gebruik behoort minder as 50% te wees en die geheue-gebruik onder 60% voordat jy MS Teams gebruik.
  4. Indien MS Teams oop was voor ʼn vergadering, maak dit toe en weer oop te minste 10 minute voor jou vergadering begin. Om dit te doen, regskliek op die Teams-ikoon op die taskbar, kies Quit en maak dit weer oop. 

5. Indien jy jou Internet (bv. tuis) met ander gebruikers deel, maak seker dat hulle weet jy is in ʼn vergadering sodat die Internet-verbinding nie onnodig oorlaai word nie (met bv. video’s, TV kyk of opdaterings) Skakel jou kamera af en gebruik slegs oudio as die spoedtoets of rekenaar se hulpbronne beperkings uitgewys het.

6. Indien jy die vergadering lei of aanbied en jy twyfel oor jou verbinding tuis, doen dit eerder vanaf die kantoor of kampus waar dit minder waarskynlik is dat jy probleme sal hê. Gebruik Ethernet (ʼn kabel direk verbind aan jou internetpunt) eerder as Wi-Fi indien dit beskikbaar is.

7. Hou ʼn tweede toestel met Microsoft Teams byderhand vir ingeval, b.v. ʼn selfoon met LTE-data. Oefen om toestelle te wissel sodat jy gewoond is aan hoe dit werk voordat jy `n vergadering moet lei.

Stappe om te neem indien jy ʼn slegte verbinding het.

  1. Sit die kamera af indien dit aan was.
  2. Sit inkomende video af (laaste item onder die driepunt-spyskaart) 
    Jy sal steeds gedeelde skerms en kommentaar kan sien.

3. Skakel oor na ʼn ander toestel as die laaste alternatief, byvoorbeeld MS Teams op jou selfoon of tablet.

[:]

[:en]Adjust your font size[:af]Vergroot jou font[:]

Wednesday, April 7th, 2021

[:en]

Are the characters in your emails suddenly substantially smaller than a year or two ago? Not? Then you are clearly still too young. For the rest of us – you know who you are, I see you squinting at your screen – there is a solution.

We all know you can change the font of your text in Outlook, for example. The only problem is that the receiver on the other end will have to also read your email in Tahoma size 16. Ideally you should only use a font size of 11 or 12 whether you work in a Word document, in Teams or compile an email. Instead of changing the default font in your applications, there’s another way. 

  1. If you are working on a laptop or tablet with a touch-pad you can access the Text Zoom function by stretching two fingers away from each other. This will activate the zoom function and whatever you read on the screen will be enlarged.
  2. If you are not working on a laptop or don’t have a touch-pad, open a new email (or reply to one) go to Format Text on your Outlook menu bar and select the Zoom option. It will give you the option to enlarge the text up to 200%. (See below) 

        3. The same can be done if you have a mouse with a scroll wheel button to adjust text zoom level (see below)

      4. Not all apps support the Text Zoom by using the touch-pad or Ctrl + mouse wheel. Here is another method for Windows 10 if you want to change the size of text, apps & other items for all Windows apps, other than just Outlook & MS Teams.  Just right-click anywhere on your desktop. Select Display Settings and choose the % you want to enlarge it with.

If you are still struggling you are welcome to log a request for one of our technicians in the ICT Partner Portal.

[:af]

Lyk die karakters in jou e-posse skielik beduidend kleiner lyk as net `n jaar of twee gelede? Nie? Dan is jy duidelik te jonk. Vir die res van ons – diegene wat hulle oë op skrefies trek in plaas van `n leesbril te kry – daar is ʼn oplossing.

Ons weet almal dat jy die fontgrootte van die teks in, byvoorbeeld, Outlook kan verander. Die enigste probleem is dat die ontvanger aan die ander kant ook jou e-pos in Tahoma, grootte 16 sal moet lees. Ideaal gesproke behoort fontgrootte by verstek 11 of 12 te wees, hetsy jy in Word dokument, Teams of Outlook werk. In plaas van om die fontgrootte te stel kan jy een van die volgende opsies probeer: 

  1. As jy op ʼn skootrekenaar of tablet met ʼn taspaneel werk kan jy die Text Zoom funksie aktiveer deur jou twee vingers wyer uitmekaar te strek. Dit sal die zoomfunksie aktiveer en wat jy ookal op die skerm sien, sal vergroot word. 
  2. Indien jy nie op ʼn skootrekenaar werk nie of nie ʼn taspaneel het nie, maak net `n nuwe e-pos oop, gaan na Format Text op jou Outlookspyskaart en kies die Zoom-opsie. Dit sal jou die opsie gee om die teks tot 200% te vergroot. (Sien onder) 

        3. Indien jy ʼn muis het met ʼn rolwiel-knoppie het, kan jy ook jou Zoom-vlak aanpas. (sien onder)

      4. Nie alle toepassings ondersteun die Text Zoom deur middel van die taspaneel of Ctrl + muis-rolwieletjie nie. Hier is nog ʼn metode in Windows as jy die teks, toepassings of enigiets anders in Windows, bo en behalwe Teams, wil verander. Regskliek net enige plek op jou invalskerm. Kies Display Settings en Scale and layout. Kies die % waarmee jy dit wil vergroot.

As jy steeds sukkel is jy welkom om ʼn versoek aan te teken vir een van ons tegnici op die ICT Partner Portal

[:]

[:en]FindTime add-in for meetings[:af]FindTime-toepassing vir vergaderings[:]

Wednesday, April 7th, 2021

[:en]

If the responsibility of organising meetings often falls on your shoulders you will know that it could be a challenge to find a time which works for everyone. Fortunately Microsoft has found the solution with one of their Office365 ad-ins.

FindTime is an optional add-in which simplifies the process of finding the appropriate date and time for a meeting between colleagues. It’s particularly useful when there are attendees from non-SU, external companies. 

With FindTime the organiser creates a voting poll where the available dates and times are listed. The attendees can then vote for the times and dates which suit them best. 

When the poll is compiled the following functions are also available:

  • to create the meeting automatically as soon as everyone agrees on a time and date;
  • to immediately book the date in your diary;
  • to receive updates on the voting poll when someone votes; 
  • to close the voting poll so that no other times can be suggested and 
  • verification by PIN. 

The FindTime add-in can be installed in Outlook 365 (for web-based email, the Outlook client or Apple OSX). If external people are invited to the meeting it’s not necessary for them to use Outlook – everything is done through a link sent by FindTime.

You can install FindTime yourself from the Microsoft website or log a request on the ICT Partner Portal for one of our technicians. 

[ARTICLE BY ARLO KOEN]

[:af]

As jy gereeld vergaderings moet reël weet jy waarskynlik dat dit dikwels ʼn uitdaging is om die gepaste tyd in almal se skedules te kry. Gelukkig het Microsoft ʼn oplossing met een van hulle Office365-toepassings.

FindTime is ʼn addisionele toepassing wat die heen en weer geskarrel om ʼn geskikte dag en tyd vir ʼn vergadering tussen kollegas te vind. Dit is veral handig as persone van eksterne maatskappye ook die vergadering moet bywoon.

Met FindTime skep die organiseerder ʼn meningspeiling waarin die beskikbare datums en tye gelys word.  Uitgenooides kan dan stem watter dae en tye hulle die beste sal pas.

Wanneer die peiling opgestel word is die volgende funksies ook beskikbaar:

  • Om die vergadering outomaties te skep as almal ooreengekom het op ʼn datum en tyd;
  • om tydelik die datums te boek in jou dagboek;
  • opdaterings te kry oor die meningspeiling wanneer iemand stem;
  • die meningspeiling te sluit sodat ander tye nie voorgestel kan word nie en
  • verifikasie deur middel van ʼn PIN. 

Die FindTime-toepassing kan bygevoeg word in Outlook 365 (webgebaseerde e-pos, die Outlook-kliënt of Apple OSX). Indien eksterne persone uitgenooi word na ʼn vergadering hoef hulle nie self Outlook te gebruik nie – alles word uitgevoer deur middel van ʼn skakel wat FindTime stuur.

Jy kan self FindTime installeer vanaf Microsoft se webwerf. of ʼn versoek aanteken op die ICT Partner Portal vir een van ons tegnici.

[ARTIKEL DEUR ARLO KOEN]

[:]

[:en]SUNLearn support for students[:]

Thursday, April 1st, 2021

[:en]

Are you a Matie? Then you use SUNLearn.

Face-to-Face SUNLearn Support for students is now available at the IT Hub on Monday, Wednesday and Friday from 09h00-17h00.

Do you need assistance with:

  • SUNLearn access and log in issues?
  • Basic SUNLearn site navigation?
  • Accessing courses and course materials?
  • Knowing what to expect when your assessments are due?
  • Struggling to submit an assignment or find your Turnitin report?

Then set up an appointment today by sending an email to: angunge@sun.ac.za

We also offer weekly webinars for basic SUNLearn training for students on Tuesday and Friday at 18h00.

To make a booking for individualised SUNLearn assistance and support, please email angunge@sun.ac.za

[:]